For your convenience, we also put link buttons for the downloadable PDF file below:
MKIII OPERATIONS MANUAL PDF - ENGLISH
Red Pulse MKIII
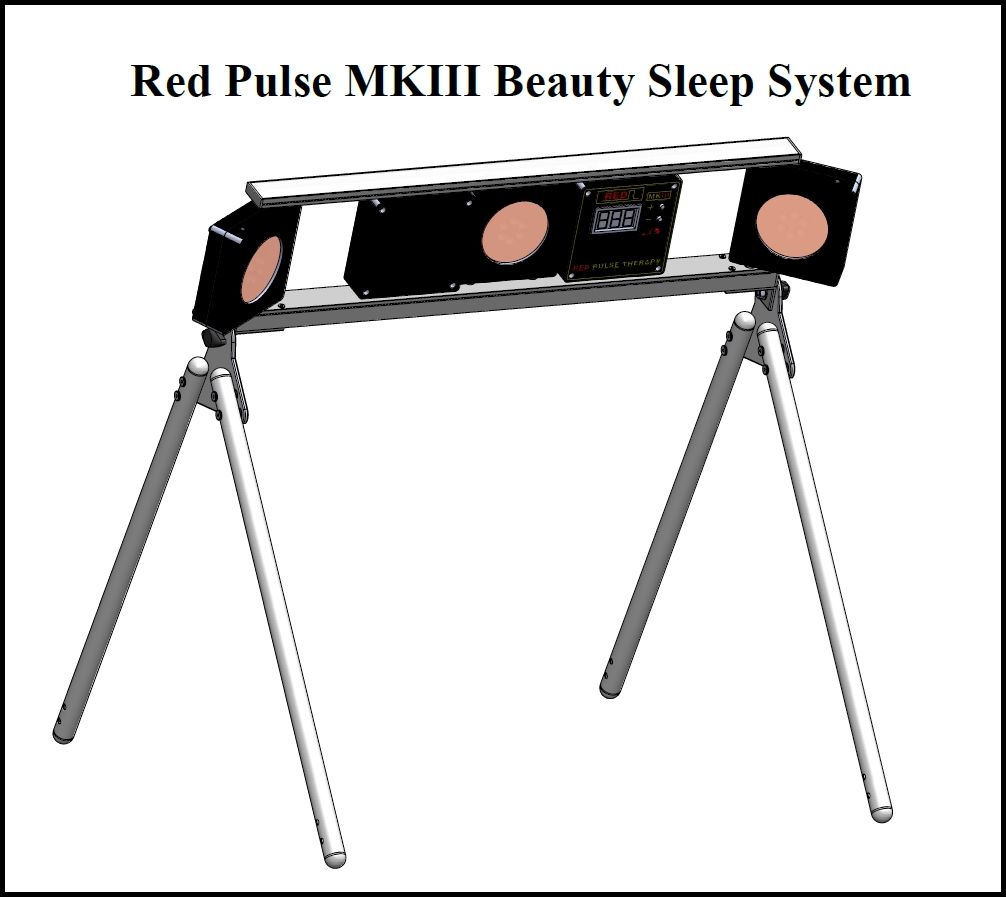
Red Pulse MKIII Model operation manual
Red Pulse red light therapy product lines are the first and only poly-spectrum red light therapy products on the market that are equipped with our unique “high frequency pulse drive technology”. Red Pulse products take the advantage of the higher skin penetration properties of high frequency pulsed wave irradiation, increasing therapeutic results by many times (based on published research from Ariel University, Ariel, Israel, https://doi.org/10.1371/journal.pone.0245350).
For more information on Red Pulse technology, please visit our website: www.redpulsetherapy.com.
This package contains:
Red Light Therapy light Engine, LED Driver/controller/timer assembly
Triangular light-stand x 2
AC Power Cord
AC-DC Power Adaptor
Wired remote control wand
User Manual
Eye covering x 5
1 set of screw and nut adjusting tools
Specifications:
Pulsed output peak power 135W total - Two side LED lamps - 50W each, center LED lamp -35W
Operating Average Power 65W total (pulsed peak at 135W)
Product Size Approximately 7” x 10.6” X 27.6” (18 X 27 X 70 CM), including packing material
Light Source LED QTY 108 pieces 1W LED combinations (poly spectrum)
Wavelength 540~880nm poly spectrum
Product material Aluminum frame
Net Weight Approximately 10 pound (4.5 KG), including packing material
Timer control 1~40 Minutes, smart user programmable digital timer
Recommended treatment time On one same treatment area, 20 minutes treatment time is recommended for facial treatment. 20~40min on non-facial area do not exceed 40 min. Do not repeat treatment on the same area within 3 hours.
WARNING
— Only use the Red Pulse MKIII model after reading this User Manual fully.
— DO NOT scratch or damage the light (especially the lens).
— Keep away from flammable aerosol products or areas where where oxygen is being administered.
— This device is not waterproof, so keep the cord away from water and heat. DO NOT operate this device if the cord or the plug has been damaged or submerged in water. DO NOT put into dishwasher or submerse in water/cleaning solutions.
— DO NOT open or dismantle the light fixture.
— USE ONLY the power supply included with the Red Pulse MKIII model original package.
Precautions
— Please note, some LED diodes installed are infrared and near infrared spectrum, which are invisible to the human Therefore, they may not show they are emitting light during operation. The Red Pulse poly-spectrum light therapy system emits very powerful light output. It can cause discomfort or damage to the eye if the user looks directly at the light source; it is important to turn your eyes away from the light source while the product is projecting light. Eye coverings must be used if the light is pointed at the face during facial therapy.
— Do not use if using cancer fighting drugs or drugs increasing photosensitivity.
— Do not use when receiving steroid shots.
— Do not use if you are pregnant without consulting with your doctor.
— Do not allow children to use unsupervised.
TEST FOR LIGHT SENSITIVE SKIN
— Some medicines you take, or products you use, can cause light sensitive skin. Before you begin, test the Red Pulse MKIII model treatment on your arm or leg first.
Test your skin:
1. Turn on the MKIII model (please review the user instructions below for detail).
2. Place the lamp head 4 inches above an area of your arm or leg for the full 5 minutes treatment time.
3. Wait 2 hours. You should NOT experience any adverse reaction during the next 2 hours. An adverse reaction is any pain or skin redness in the treatment area.
4. If you have no reaction, you may continue with the treatment at your convenience.
CLEANING MAINTENANCE
— Always unplug the Red Pulse MKIII model AC power cord from the AC outlet before moving it from one location to another location.
— Your Red Pulse MKIII model requires very little care. Use a soft cloth to clean the device surface.
— To carry the fixture for traveling, reverse the user assembly steps from step 7 to step 1, to put it back into the foam padded box as shown below. Insert back to the original carrying travel bag for easy travel.
— For long term storage, pack the fixture into the original carrying travel bag and store in a safe, dry place.
Warranty
Your Red Pulse MKIII is warranted free from defects in material and workmanship under normal use for a period of 1 year after its original purchase date.
Benefits backed by science
Research shows that wavelengths in the spectrum of 550-900nm show optimal efficacy for the following applications:
— Skin Rejuvenation
Promotes collagen production, increasing the elasticity of skin, reducing wrinkles, and improving aesthetic characteristics of skin
— Sleep Quality
Helps to enter deeper and more effective sleep, relieving daytime fatigue.
— Mitigation of sleep disorders
Boosts natural melatonin levels and mitigates chronic insomnia
— Prevention of hair loss and benefits to hair regrowth
Prevents abnormal hair loss, increases hair count and the thickness of the hair shaft, and reduces gray hair in men and women.
— Accelerated wound healing
Speeds up tissue regeneration, improving wound healing and diminishing scars.
— Reduction of inflammation and pain
Reduces inflammation and encourages healing of chronic pains, proven to reduce suffering to many different forms of arthritis and muscle pain.
— Enhanced blood circulation
Helps blood circulation, dissipating bruises and reducing swelling.
— Fitness Recovery
Promotes muscle recovery and performance, improving energy level.
Applications:
1. For Skin rejuvenation and promoting sleep – Place lamp head 8-16 inches from the face (Fig. 1), recommended treatment time is 20 minutes.
Apply to face and neck area to reduce wrinkles and increase collagen. The best time for skin rejuvenation treatment is after skin area is clean and free of makeup or other cosmetic products.
Focus the light beam to face and neck area also helps your body produce more melatonin promotes relaxation and facilitates sleep. The best time for insomnia treatment is immediately before bed, and serious activity is not recommended after this treatment.
2. For hair loss and promoting hair regrowth – Place lamp head 4-10 inches from the scalp (Fig. 2). Recommended treatment time is 20 minutes. For long hair, increase recommended time to 40 minutes with occasional combing to allow the red light to reach different part of the scalp.
Apply to the scalp area, arranging hair so the light can reach the scalp unobstructed. For long hair, comb periodically to expose different part of the scalp skin to the red light.
3. To decrease pain (Anti-inflammatory) – Place lamp head 2-10 inches from the treatment area (Fig. 3, 4, 5), recommended treatment time 20-40 minutes.
Apply to back, shoulder, thigh, knee, leg, ankle and feet to reduce swelling, soreness and muscle pain.
4. To improve fitness and weight loss – Place lamp head 2-10 inches from the treatment area (Fig. 6), recommended treatment time 20-40 minutes.
Apply to stomach and belly to help reduce stomach pain, improve digestion, and help bowel movement and weight loss.
5. For Wound healing – Place lamp head 2-10 inches from the treatment area.
Apply to bruises and scar areas to improve wound healing and diminish scars.
User tips:
— DO NOT block the light path with anything between the light source and the treatment area.
— DO NOT apply sun screen to the treatment skin area.
— DO NOT apply heavy skin cream on the treatment skin area. Only a thin layer of skin moisturizer should be used for the period of treatment.
— A pair of eye-coverings must be used if the light is pointed at the face during the facial therapy. Any comfortable eye-covering can be used. We have included 5 pairs of our custom-made eye patches with the original package. For sanitary reasons, the eye coverings should not be shared by any other person and should be stored in a clean container between each use. We recommend users to discard their eye covering after 1-4 weeks multiple usage depending on the soil level. We do offer our custom-made new replacement eye patches for sale on our website: www.redpulsetherapy.com.
— Only turn the light on after putting on eye coverings for the facial therapy.
— Keep the light source lamp head at least 2 inches away from the treatment skin area.
— The beam angle of our lamp is about 25-30 degrees. Therefore the footprint of the light coverage will be smaller the closer the lamp head is to the treatment area and vice versa.
— The light energy that penetrates and is delivered to your cell is inversely proportional to the square (power of 2) of the distance from the lamp head to the treatment area. Therefore, it is recommended that users place the lamp head as close as possible to fully cover the treatment area to get the maximum benefit from the treatment.
— Typical treatment time is recommended to be 20 minutes. If the treatment area is large (for example, the back or the stomach, etc.) and the lamp will need to be placed farther away. In this case, it is advised to increase the treatment time up to 40 minutes to compensate for reduced intensity.
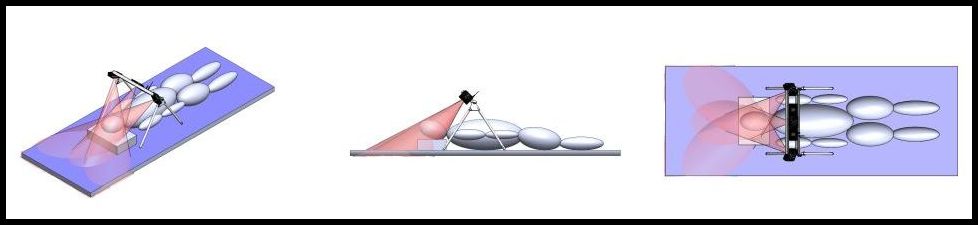 FIG 1. Face and neck skin rejuvenation and sleep disorder
 FIG 2. For reducing hair loss and improve hair growth
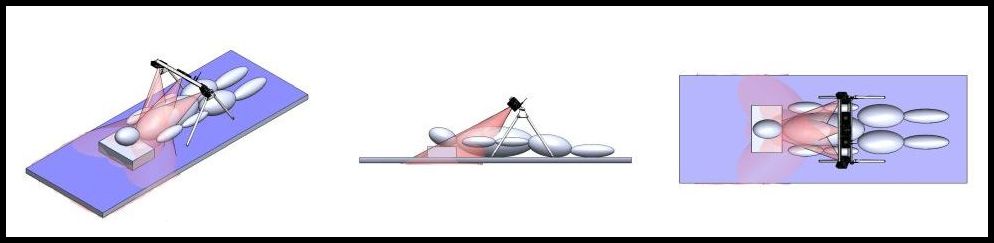 FIG 3. Increase chest blood circulation and rejuvenate neck skin
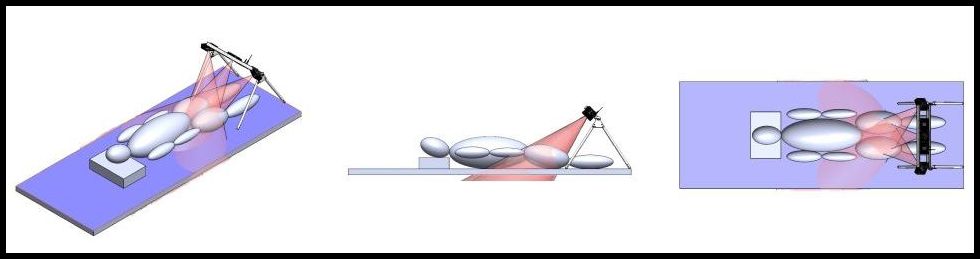 FIG 4. Improve thigh area blood circulation reduce aching
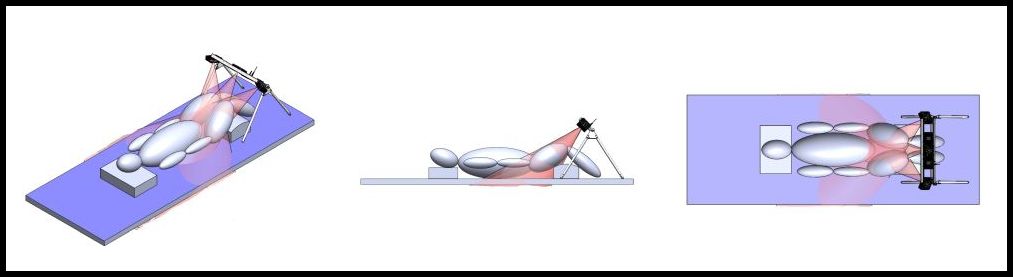 FIG 5. Improve knee area blood circulation reduce aching
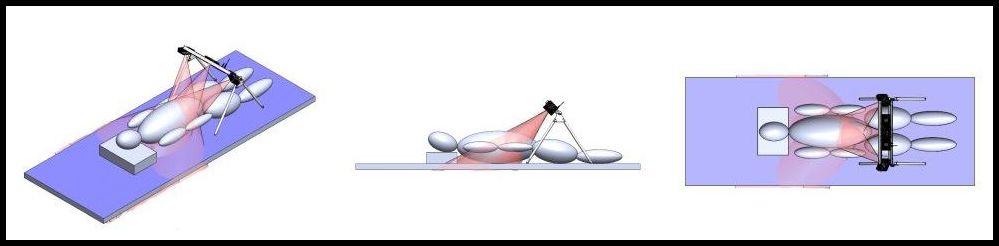 FIG 6. Improve stomach area blood circulation reduce aching
Red Pulse MKIII Model user assembly setup instructions:

Red Pulse MKIII Model user assembly packing instructions (for storage or carry-on luggage):
To pack up the MKIII fixture, follow the steps listed above in reverse order, and insert the packing box into the original travel bag for carry-on luggage or to put into storage.
Operating instructions:
**************************************************************************************************************************************
First remove the foam padded packing box from the original travel carrying bag. Follow the user assembly steps 1-7, as shown above, to assemble and set up the Red Pulse MKIII fixture.
After the fixture is fully set up, follow the operational instructions below to operate the unit.
***************************************************************************************************************************************As shown in step 7 above:
1). Plug the AC-DC adapter DC output plug into the Red Pulse LED driver controller DC input socket and plug the remote-control switch connector into the 3.5mm audio socket.
2.) Plug the 120Vac Power Cord IEC connector into the AC-DC adapter and plug the other end to AC utility outlet. The MKIII should turn-on into the initial state and will be ready for operation setup.
The MKIII should turn on into the initial state and will be ready for operation setup.
Once MKIII power setup is complete, it is not necessary to unplug the power supply from AC outlet after each session. MKIII will stay in a low power standby state when not in use. It is only necessary to switch off or unplug from the AC outlet if the MKIII will not be used for an extended time.
Note: Please follow the plugs connection sequence listed above to plug in all the power connectors. If one plugs the 120Vac AC-DC adapter into the AC utility outlet first and then plugs the AC-DC adapter DC output plug into the Red Pulse LED driver controller DC input socket afterward, one may see harmless but undesirable electrical sparks around the controller DC input socket. The spark is induced by the quick discharge of the power supply fully charged output capacitor into the Red Pulse LED driver controller DC input capacitors and will not harm the user or the MKIII system by any means.
Initial state: When the power is first applied, all LEDs are in the OFF state. (Standby state)
Display indicator shows: Flashing [OFF]
Timer set up – The Red Pulse Multi-Spectrum Light Therapy System includes an internal programmable timer switch to optimize the control of light treatment. It can be easily programmed by the user to operate from 1 to 40 minutes and will turn off the light output after the programmed time has expired.
The timer control has three control buttons on the main controller and an optional wire connected remote ON-OFF control button:
Buttons:
[Δ]: Increase (on main controller)
[∇]: Decrease (on main controller)
[↵]: ENTER/ON-OFF control (Both on the main controller and the remote on-off button)
The System Control and Timer setup can be programmed as follows:
— Step 1: Initiation of Timer-Setting mode
First—short-push: (less than 1 second) on any of the [Δ], [∇] or [↵] buttons. Initiate the timer into the Timer-Setting mode, and the timer default setting value is 20 minutes. (20 minutes is the recommended treatment time for normal operation) Users can increase the treatment time up to maximum of 40 minutes or reduce the time down to 1 minute.
Display indicator shows: Flashing [S20], where flashing S indicates the system is in the countdown Time-Setting mode and 20 shows the default timer-setting value, it can be set from 1 to 40 minutes.
— Step 2: Program timer minute setting
A. Short Push: (less than 1 second) [Δ] or [∇] button will increase or decrease 1 count of the minute of the countdown timer setting.
B. Long Push: (more than 1 second) [Δ] or [∇] button will enter into fast-setting mode and the timer setting will go up and down at a faster speed.
Display indicator shows: Flashing [SXX], where flashing S indicates the system is in the countdown time-setting mode and flashing XX shows the treatment setting minutes, it can be set from 1 to 40 minutes.
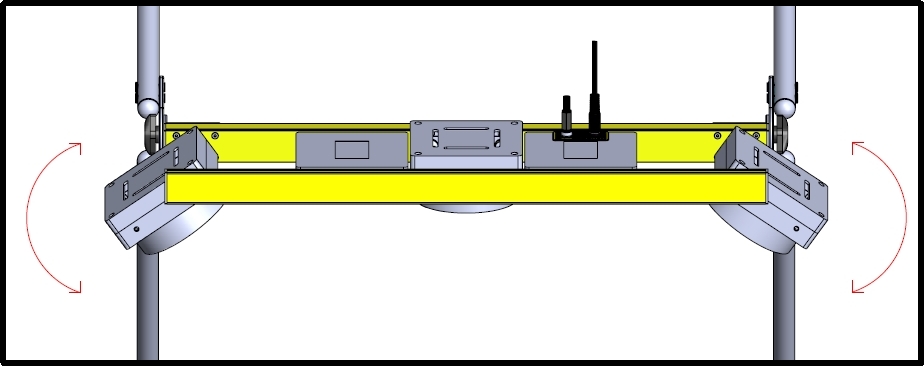
— Step 3: Start Light source lamp head Position (angles) Adjust mode
After the countdown timer is set between 1 to 40 minutes, within 10 seconds, push the [↵] button to initiate the Lamp Position Adjust mode. In this mode, the LEDs will turn on to a dimmed state. This comfortable low light intensity state allows the user to adjust the Red Pulse light source lamp head. The light engine panel can be adjusted to tilt up and down and the two side light source heads can rotate left and right to point the light beam to the treatment area (Please refer to Fig. 8 and Fig. 9 below).
Display indicator shows: [AXX] (only A is flashing) to indicates the system timer is set and waiting for user to adjust the position of the Red Pulse lamp heads.
Fig. 8 –
The light engine panel can be adjusted to tilt +/- 90 degrees
by loosening and tightening the side thumb screw
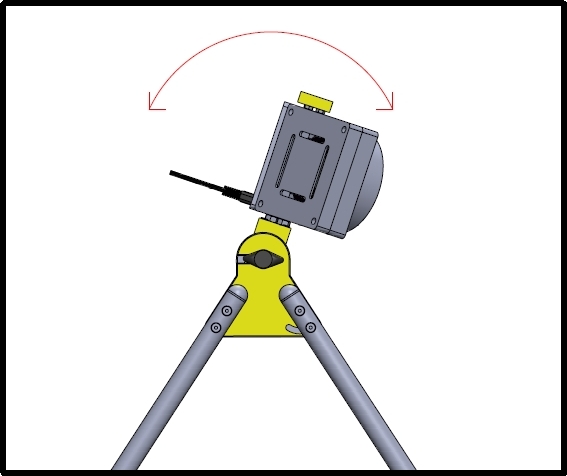
Fig. 9 –
The two side lamp heads can be adjusted to rotate 360 degree by hand
— Step 4: System ON-OFF and PAUSE control
A. Timer ON control: After the lamp position is secured and ready for the treatment, pushing the [↵] button will turn all the Red Pulse multi-spectrum LEDs fully on and start the count-down of treatment minutes.
Display indicator shows: Rotation bar only on the first digit [_XX ], where the “_” bar rotates around to show the timer countdown is in action and XX shows the remaining treatment minute value.
B. Pause control: Once the treatment starts, and before the treatment period ends, pushing the [↵] button will pause the countdown timer and temporarily turn off the Red Pulse multi-spectrum LEDs and wait for “resume” command. This allows the user to take care of any external interruption. The system will stay in this “PAUSED” state until the user is ready to resume the therapy by pushing the [↵] – the “resume” command – again. This pause action can be repeated before the minute timer counts down to 0.
Display indicator shows: [PXX] only P is flashing (to indicate the system is in the “PAUSED” state and XX is the remaining treatment minutes.)
C. Auto shutoff: When the timer counts down to 0, all the LEDs will automatically turn OFF and be ready for another session.
Display indicator shows: Flashing [OFF]
D. Shutoff and Forced shutoff control:
1. If the display setting is < 0 >:Push the [↵] button will put the system in the OFF state and ready for another timer setup.
2. If the timer is set to its final value and the [↵] button is not been pushed within 10 seconds, the Red Pulse multi-spectrum system will return the system back into the OFF state.
3. Forced shutoff at any time: After the system starts the treatment, during the minute countdown, the system can be forced to turn OFF anytime by a long (more than 3 seconds) push on the [↵] button.
4. Display indicator shows: Flashing [OFF]
— Step 5: Timer bypass ON-OFF control
A. Continuous-ON state control:
From the OFF state, a long (more than 3 seconds) push of the [↵] button will turn the system on and bypass the internal minute timer control. The system now is in the Continuous-ON state.
Display indicator shows: Steady [ON], for the first 40 minutes, but after 40 minutes begins flashing [ON] as a warning about extended time.
B. OFF control for Continuous-ON state:
In the Continuous-ON state, the system can only be turned off by a long (more than 3 seconds) push of the [↵] button.
Display indicator shows: Flashing [OFF]
Note: When the display indicator shows flashing [OFF], it means that the MKIII is in a lower power standby mode waiting to start another session.
****************************************************************************************************************